
A Google Scholar profile gathers a researcher's publications, citations, research interests and affiliation on one public page.
Creating one takes minutes. Keeping it accurate takes more care, because a wrong paper, an unverified affiliation or duplicate records make a profile harder to trust.
This guide covers what a profile is, how to set one up in 12 steps, and how to keep it accurate over time.
Quick Answer: How Do You Set Up a Google Scholar Profile?
To set up a Google Scholar profile, sign in with a personal Google account, enter your name and affiliation, add research interests, verify an institutional email if you have one, add your publications, remove wrong records, merge genuine duplicates and make the profile public. After setup, check it after each new publication and each change of institution.
Google states that a profile must be public and have a verified institutional email to be eligible for Google Scholar author search results. Eligibility does not guarantee a ranking or raise citation counts.
What Is a Google Scholar Profile?
Google Scholar is Google's search service for scholarly literature. It covers journal articles, conference papers, theses, books, preprints and technical reports from publishers, universities and repositories.
A Google Scholar profile is a separate, optional feature: a public author page that groups the papers associated with one researcher. It can show:
• name and institutional affiliation, with verification status;
• research interests;
• publications and citation counts;
• h-index (the number of papers with at least that many citations each) and i10-index (the number of papers with at least 10 citations);
• a homepage link.
Papers can appear in Scholar search without any profile. The profile connects them to you, much as ORCID, a free persistent identifier that follows a researcher across institutions, does elsewhere.
Why Does a Google Scholar Profile Matter?
Think of the profile as a research identity page, not a citation scoreboard. A reader who meets your name should be able to answer four things quickly: who you are, what you research, what you have published, and whether those papers are really yours. Collaborators, supervisors, students and conference organisers rely on this to understand a researcher's work.
Does a Google Scholar profile increase citations?
No, not by itself. A profile does not make a paper more important. What it does is make an existing record easier to identify, understand and verify.
How to Set Up a Google Scholar Profile
Step 1: Use a Google account you can keep
Use a personal Google account, not one issued by your institution. Researchers change universities, PhD scholars graduate and postdoctoral contracts end, and institutional accounts are often disabled afterwards. A personal account keeps the profile reachable throughout a career. A current institutional email can still be verified in Step 5.
Step 2: Enter your researcher name
Use the name by which your publications are most commonly recognised. Then search Scholar for each variant you have published under, such as A. K. Sharma, Anil Sharma and Anil K. Sharma. Papers that appear only under a variant may need adding by hand in Step 7.
Step 3: Add your academic affiliation
Enter your current position and institution plainly, for example "PhD Scholar, Department of Marketing, XYZ University." A line such as "Researcher | Author | Thinker | Consultant" tells a reader nothing they can verify. The goal is identification, not personal branding.
Step 4: Choose specific research interests
Specific interests let a stranger understand your area in a few seconds. Broad labels such as Science, Research or Management do not.
• Marketing: consumer behaviour, artificial intelligence in marketing, services marketing, digital platforms.
• Neuroscience: Alzheimer's disease, neuroimaging, biomarkers, cognitive decline.
Step 5: Verify your institutional email
Verification is one of two conditions for appearing in author search results. The other is a public profile (Step 12). It also confirms your affiliation to readers.
No institutional email? A profile can still be created and maintained. Never invent an affiliation or borrow someone else's credentials to obtain verification.
Step 6: Add your publications carefully
Google Scholar may suggest groups of papers that appear to be yours. For every suggested paper, confirm the title, co-authors, journal and year before adding it. This matters most for researchers with common surnames or initials. A shorter, accurate list beats a longer one containing someone else's research.
Step 7: Find missing publications
Search Scholar for any paper that is missing and add it to your profile. If Scholar cannot find the record, a publication can be added by hand.
A manual entry only places the record on your profile. It does not mean the paper has been indexed in Scholar search. If a legitimate paper never appears in search, the cause usually lies with the publisher, repository or webpage hosting it.
Step 8: Remove publications that are not yours
Select any record that is not yours and delete it. Typical causes are similar names, shared initials, overlapping topics and incomplete metadata. Borrowed citations do not make a profile more visible, only less reliable.
Step 9: Merge genuine duplicates
One paper can appear as a preprint, a repository copy and the published article. Scholar provides tools to merge entries that are versions of the same work. A conference paper and its extended journal version can be different works, so check before merging, and never merge two studies only because their titles look alike.
Step 10: Choose how updates are added
Scholar lets you choose how new matches reach the profile. Automatic updates suit researchers with distinctive names. Reviewing each suggestion first suits common names and initials. Either works, as long as the list stays accurate.
Step 11: Add a professional photo and homepage
A clear photograph helps readers recognise you. Link a homepage that confirms who you are, such as a university profile, an institutional research page, a laboratory site or a professional academic website. Avoid promotional pages.
Step 12: Make the profile public
A private profile adds little to discoverability. Make it public, then open it while logged out to see what other researchers see. Check that the name, affiliation, research interests, publications, photo and verification status display as intended.
Why Citation Counts Differ Across Databases
Google Scholar searches widely across scholarly material on the web. Scopus and Web of Science use their own source-selection rules, so each database counts different documents and citations.
In one published example, the same author's h-index was 8 in Google Scholar and 4 in Scopus (Mondal and Mondal, 2022). A difference like this is not necessarily an error. When reporting a metric professionally, name the database it came from. For how each metric works, see Impact Factor vs CiteScore vs h-index.
When to Check Your Profile
Creating the profile is the start. Matching errors build up quietly, so check it at these points.
Trigger | Why check | What to inspect | Action |
New paper published or accepted online | Scholar may miss it or match the wrong record | Title, co-authors, year | Add it, or delete a wrong match |
The same paper appears more than once | Preprint, repository and publisher versions can look like duplicates | Whether the entries are the same work | Merge identical works only (Step 9) |
Change of institution | An old affiliation misleads readers and breaks verification | Affiliation, verified email, homepage | Update all three |
Change of research focus | Interests reflect what was entered at the start | Interest tags against recent papers | Replace outdated tags |
No trigger | Wrong matches build up quietly, especially with automatic updates | The full publication list | Check about every six months |
The six-month interval is a practical suggestion, not a Google rule.
Use Alerts Instead of Refreshing Citation Counts
Scholar can email you when something new appears, which is more useful than checking the numbers daily. You can follow new articles from a researcher's profile, follow new citations to your own work, or set up an alert on a search query to track a topic.
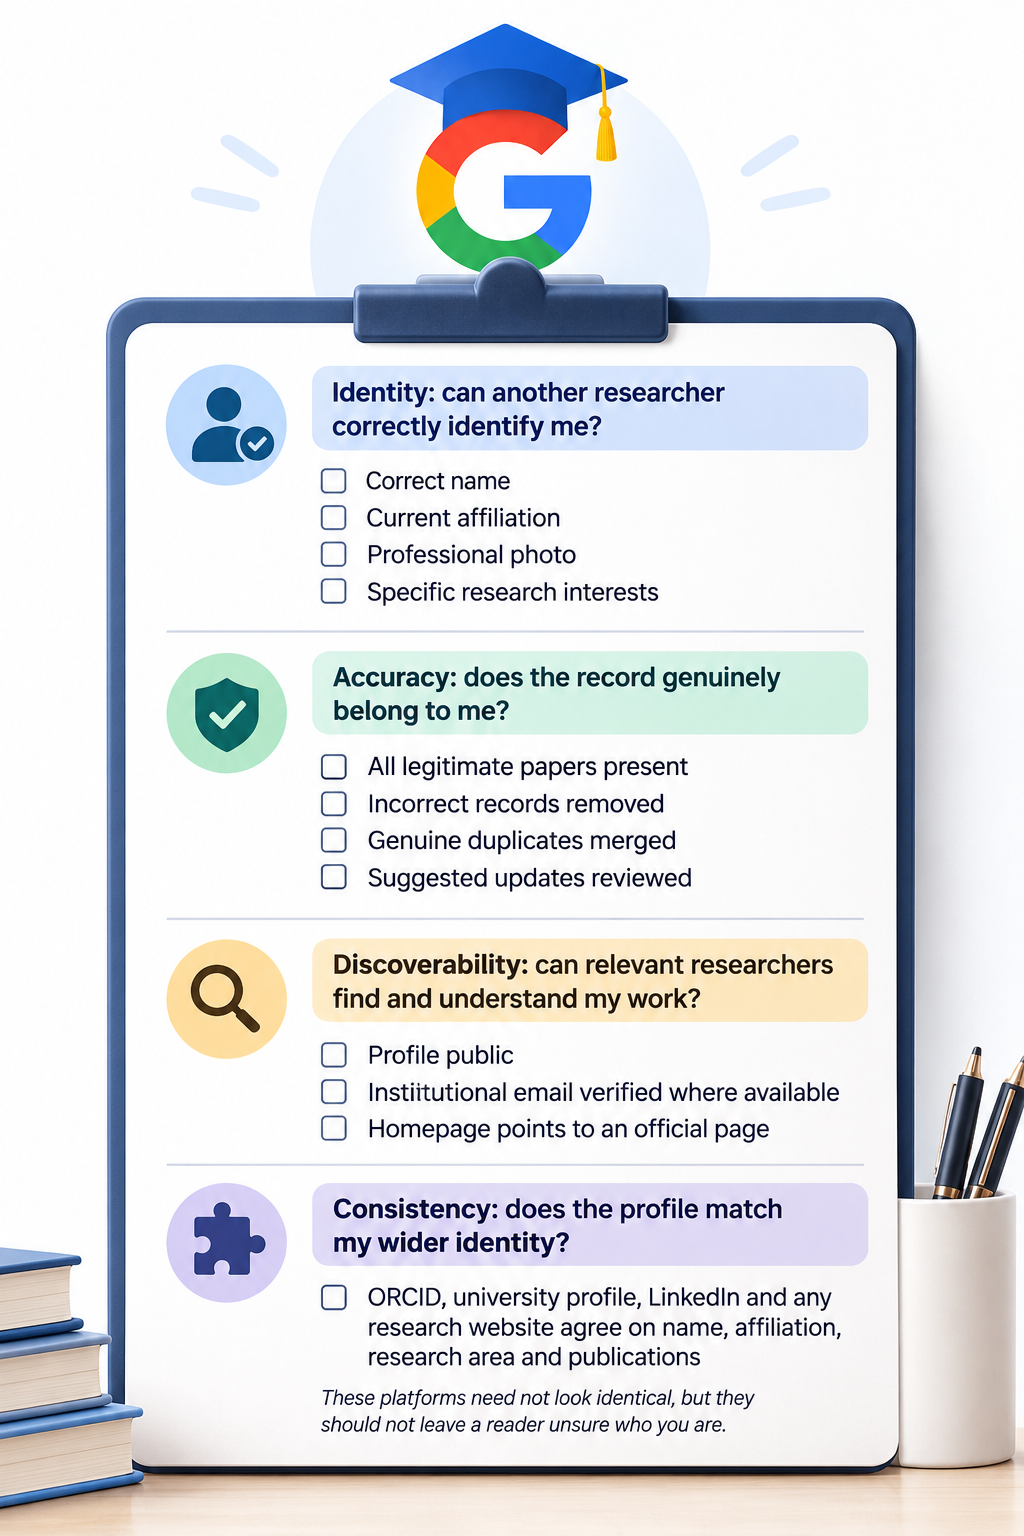
Academic Visibility Framework and Checklist
Instead of asking how to make a profile look impressive, ask four questions: can another researcher identify me, does the record belong to me, can the right people find my work, and does it match my wider academic identity? The checklist below follows those four.
Mistakes to Avoid
• Accepting every suggested paper. With a common name, one wrong paper can attach another researcher's citations to the profile.
• Using an institutional Google account. Access can end when the institution closes the account.
• Leaving the profile private. It will not appear in author search, so colleagues cannot find it.
• Skipping the duplicate check. The same paper listed twice clutters the list and splits its citations.
• Choosing broad research interests. Readers cannot tell what the work covers.
Frequently Asked Questions
• Is a Google Scholar profile free?
Yes. Any researcher can create one with a Google account at no cost.
• Do I need an institutional email to create a profile?
No. A profile can be created without one. Verification is needed only to be eligible for author search results.
• Can I manually add a missing publication?
Yes. Search Scholar for the paper first, and add a record by hand only if it cannot be found. A manual entry does not make the paper searchable in Scholar.
• What should I do if someone else's paper appears on my profile?
Remove it. An accurate record matters more than a larger citation count.
• Should I use Google Scholar or ORCID?
Both. Scholar helps with discovery, publication aggregation and citation tracking. ORCID gives a persistent identifier. Keep your name and affiliation consistent across them.
• How often should I check my profile?
After each new paper or move to a new institution, and about every six months otherwise.
A profile takes minutes to create. Keeping it accurate, recognisable and verifiable takes occasional attention. Done well, it helps the right people understand who you are, what you research and what you have contributed.